How To: Delete Emails in Bulk from Your iPhone's Mail App
Deleting emails can be a tedious process on the iPhone, especially since the "Trash All" options have been removed ever since iOS 10 first came out. Though likely well-intentioned, this change places an undue burden on all of us iPhone owners who now have to erase emails individually.Erasing them individually can equate to a significant amount of wasted time — just check out the video below if you don't believe me, which applies to iOS 10, iOS 11, and iOS 12. Thankfully, there's a little-known bug that you can still use to delete all unwanted emails in one go.This simple trick will work in any one of your email folders, whether they're flagged or unread. So if you're interested in deleting junk email en masse, I'll show you how to take advantage of this nifty bug now, because it could go away with the arrival of future iOS updates (though, it's already lasted three major iOS updates so far).
Don't Miss: The 5 Best Free Email Clients for iOS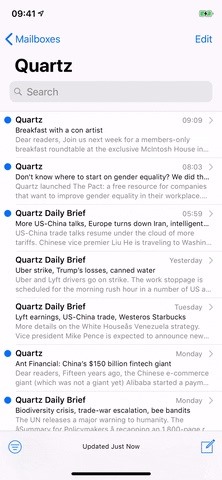
Step 1: Filter Your MailFor starters, go to any folder you wish to purge of unread emails from the Mailboxes view. It could be a default folder for each account like "Inbox" or "Archive" or a folder you made yourself.Once inside, if you want to get rid of everything in that folder, there's no need to filter it at all. Skip to Step 2 if that's your case. Otherwise, if you want to be more selective, tap on the three-line filter icon in the lower left, where you can weed out your inbox by selecting either "Unread" or "Flagged" from the Include section.If you want to grab everything, you could also select "To: Me" and "Cc: Me" under Addresses. Any filter or combination of filters on the page will work. In my example, we'll just be deleting all unread emails from the folder.
Step 2: Save Any Wanted to EmailsThe next thing you'll want to do is check to see if there are any emails you want to keep, so scroll through the filtered view to make sure you won't be deleting something important. If you find anything you don't want to delete, there are multiple things you can do.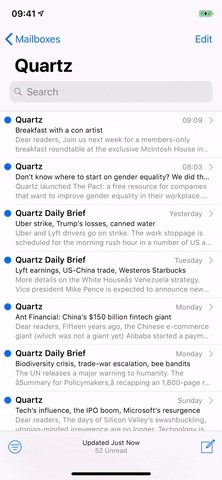
Option 1: Move to Another FolderSelect the email, tap the folder button at the bottom, then move it to a different mailbox. However, that will unintentionally mark the next email as read since it will automatically show it, so you'd have to mark it as unread before continuing. That's why it's better to use the alternative way, which also lets you save multiple emails at once: Tap "Edit" in the top right of the folder view, select all the emails you want to keep, then tap "Move" and select the appropriate folder.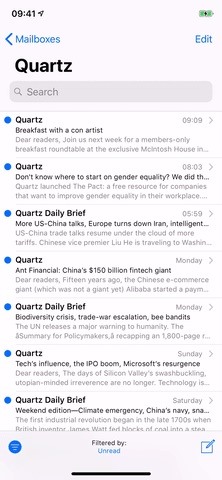
Option 2: Mark as ReadSwipe left on the email to reveal the extra options (•••) button, tap it, then mark it as read. If you have multiple emails you want to mark read, tap "Edit" in the top right of the folder view instead, select all the emails you want to save, then tap "Mark" and "Mark as Read." Then, since they don't disappear from the filtered list like they do when moving to another folder, you'll need to tap the filter button in the bottom left to exit the filter, then tap it again to go back into the filtered view.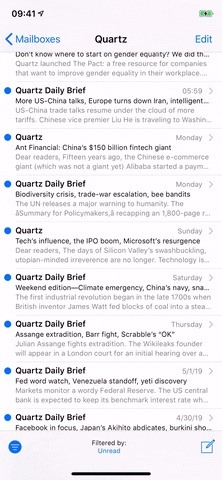
Step 3: Perform a Bulk DeleteOnce you're sure that only unwanted emails are left, it's time to proceed, so go ahead and tap on "Edit" in the upper right. Once in edit mode, select just one email by tapping the circle to the left of it.Don't Miss: Hide @iCloud, @Me & Custom Aliases from Mail's 'From' Field Now comes the magical part. Tap-and-hold the "Move" button at the bottom, but don't let go just yet. Next, tap to deselect the email you highlighted, then you can release your finger from the "Move" button. This will cause all emails in the filtered view to be selected at once, so tap "Trash" on the next screen to delete them all. You can tap the filter button again the folder view to see what's left. If you're worried that you might have deleted an important email, you can still go to your trash bin and give it one final look before the emails are permanently deleted. Once you're confident that nothing significant is in there, tap on "Edit," then "Delete All" to purge your email app of any trashed mail. You could also wait until they auto-delete, if enabled, which could be after one day, one week, or one month.Don't Miss: Use Siri with a Third-Party Email Client Instead of Apple Mail on Your iPhoneFollow Gadget Hacks on Pinterest, Reddit, Twitter, YouTube, and Flipboard Sign up for Gadget Hacks' daily newsletter or weekly Android and iOS updates Follow WonderHowTo on Facebook, Twitter, Pinterest, and Flipboard
Cover photo by Dallas Thomas/Gadget Hacks; Screenshots and GIFs by Justin Meyers/Gadget Hacks
So this was the drag and drop a part of iOS multitasking on iPhone. Next, head over on how to use drag and drop in Files app on the iPhone. Use Drag & Drop in Files App on iPhone. There is a boundary to use drag and drop for files app.
Drag & Drop in your iPad & iPhone with iOS 11, How-To
News, email and search are just the beginning. Discover more every day. Find your yodel.
Use Yelp Collections to Find New Places & Keep Your
Create a ringtone in iTunes. Select a track to use as the source. You cannot use an Apple Music item, or anything that is in the cloud. On the Get Info > Options tab set start and stop times no more than 40 seconds apart, or 30 seconds for text tones.
Block Apps from Logging Your Data on Android - Gadget Hacks
How do I Quit IRB from the command line? (Using terminal on mac) tagged ruby-on-rails terminal irb or ask new Terminal Tab from command line (Mac OS X) 660.
This wikiHow teaches you how to remove an email address from the list of addresses that you can be reached at in iMessage on your iPhone. If you remove an email address from this list, you will stop receiving iMessages at this email.
Add or remove your phone number in Messages or FaceTime
Have you ever wanted to change the status bar on your Android phone or tablet? Maybe you wanted to change the position of the clock, add a battery percentage, or just get a different look. Whatever your reason, there's a simple way to customize your status bar-and it doesn't even require root access.
How to get lollipop, marshmallow or nogut status bar on any
XAMPP servers are a free open source server that makes it cheap and easy for you to test and review your website building as you go. This tutorial covers how to configure your XAMPP server for windows.
How to Configure Your XAMPP Server - YouTube
How To: Remove the Navigation & Status Bars on Your Nexus 7 Tablet to Make the Screen Feel Bigger How To: Hack Your Nexus 7 into a Hybrid Android Tablet That Looks & Feels Like Both iOS & TouchWiz How To: Improve Cash Flow with the UPS Billing Center
I am a rare breed - I think my Android tablet is great! : Android
In Android Pie, Google ha introdotto una funzionalità chiamata "Wind Down" che mira a contribuire a combattere questo. Tuttavia, grazie a uno sviluppatore di app creativo, non è necessario attendere che Android 9.0 goda di questa funzione. Combinato con un'altra funzionalità chiamata "Shush", Wind Down è come Do Not Disturb 2.0.
ADB Over Internet? « Null Byte :: WonderHowTo
How to Call Phones from Gmail. As of August 25, 2010, you can call landline phones or mobile phones from Gmail. All you need to do is ensure that the application that enables you to call is installed, and dial the number!
Make Free Phone Calls With Google Voice - lifewire.com
0 komentar:
Posting Komentar